

Making Paved Spaces Comfortable
Many schoolyards across the country are predominantly paved. As we consider moving learning outdoors, especially where space may be limited, we must think about ways to make paved spaces more accessible and comfortable. Any space dominated by asphalt, concrete, and chain-link fencing can present challenges to establishing the feelings of joy, whimsy, and invitation. But by incorporating natural and soft materials, and adding artwork, a sense of cheerfulness and comfort can be achieved.
This document is focused mainly on bringing outdoor learning to paved schoolyards, but softening hard spaces and making them welcoming and comfortable also applies to other paved areas where outdoor learning could take place. When learning moves to parking lots, closed streets, or other paved spaces, thoughtful planning is required. Additional information on designing outdoor spaces can be found in the following Creating Outdoor Spaces chapter.

© Education Outside
Getting Started

© Education Outside

© Education Outside
We recommend beginning the process of evaluating your paved space for outdoor learning using our Campus Assessment Tool, which will guide schools and designers in gathering relevant information for an overview of the selected location.
As you begin, as in all schoolyard transformations, it is good practice to reach out to teachers, school staff, district staff, and the school community who know the site and the neighborhood and have a good understanding of the space. These community members can discuss existing conditions and share their visions for transformation. By including all voices and creating a design that prioritizes and centers those in the community, everyone is heard and is invested in the agreed-upon plans.
In non-pandemic times, paved areas serve as gathering spaces, physical education spaces, recess and play spaces, and outdoor learning areas. They are also used as accessible pathways, fire drill areas and fire lanes, arrival and dismissal spaces, parking lots, and winter snow storage spaces in northern climates. As you begin, it is important to consider which of the listed uses can and cannot be moved or changed to accommodate outdoor learning during the pandemic. The following are important issues to explore before selecting spaces for outdoor learning. For more, see the Getting Started section of the Creating Outdoor Spaces chapter.
Consider Site Conditions
Understand the microclimate. As part of your site assessment, observe which areas of the outdoor space are already shaded for part or all of the school day and which areas are affected by excessive heat. What are the impacts of weather through the seasons on your site? Is shade/overhead protection necessary? Areas of heavy water flow during a storm or areas that pond or flood when it rains are important to note. In cold climates, snowdrifts might form in certain areas due to the direction of the prevailing winds. Understand roughly how many days during the school year are difficult to be outdoors due to weather.
Look for existing assets. There may be existing seating and outdoor classroom spaces that can be used at your site. There may also be existing, easily accessible (outdoor or indoor) storage areas/sheds/containers. Determine if they can be repurposed to store outdoor learning materials. See our Storage and Supplies article for more.
Consider site conditions. It is important to evaluate the condition of the pavement at your site. Is it in relatively good condition or does it require some maintenance? Make sure that your plans accommodate and address the needs of differently abled community members and comply with the Americans with Disabilities Act (ADA). Shade and shelter from the weather is important in any outdoor classroom. Consider whether there are obstacles to erecting shade structures (e.g., overhead power lines, regulations) and whether there are potential anchor points for shade sails and other structures (e.g., sturdy building walls, high fencing, sturdy light fixtures). Check with your local permitting agency, facilities department, or a structural engineer or architect to ensure stability. Our Shade and Shelter article provides more information on this. Evaluate the vehicle traffic patterns around the area. Exposure to vehicle exhaust can increase asthma and other breathing issues for students, teachers, and other staff using the area. Finally, consider who uses the space in authorized and unauthorized ways during school or in off-hours and how this might affect your plans.
© Education Outside

© Green Schoolyards America
Design Ideas

© Education Outside

© Education Outside
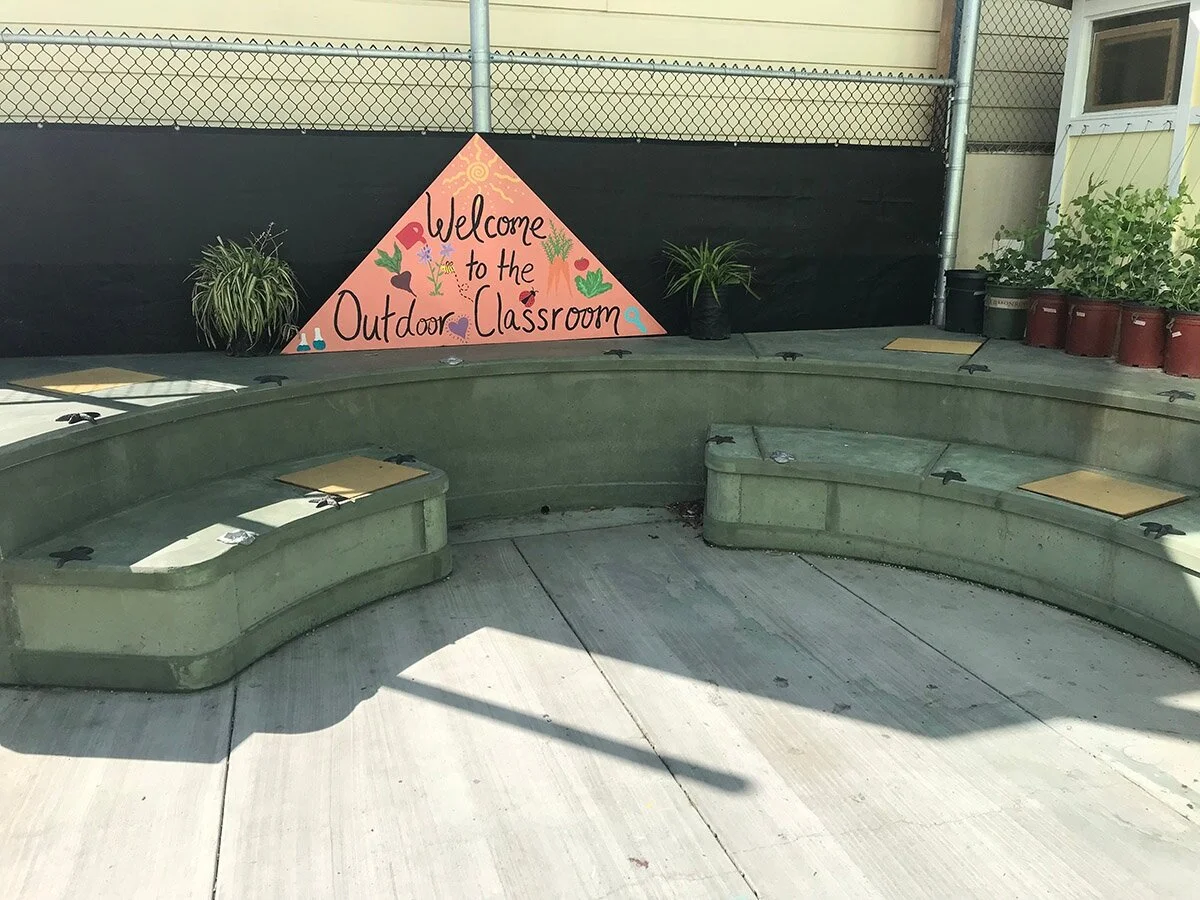
ARRANGING AND DIVIDING PAVED SPACES
Begin by designating required circulation paths and then locate outdoor learning, play spaces, and other areas. Once you have identified the locations for your classrooms based on COVID-19 precautions, ADA accessibility, site considerations, and emergency egress paths, you can begin to plan more detailed pieces of your outdoor classroom. Be sure to orient the placement of seating in a way that will keep both teachers and students from facing the sun during the school day. Try to keep each outdoor classroom far enough apart from adjacent outdoor classrooms so that the classes will not overhear each other and become distracted. When it is not possible to space groups far apart, consider dividers to separate outdoor classrooms from one another and from circulation paths. This will help block distracting views and may reduce outside noise if the divider is sound-absorbent. At the same time, take care not to use dividers that block air circulation, since that will defeat the purpose of being outside in the fresh air during the pandemic. See Addressing Sound and Noise for ideas about how to buffer outdoor classrooms from noise.
Divider options that can be used to direct students’ paths of travel without impeding airflow include straw bales (for example, a row of bales one or two high), fabric or mesh hung from a line, lightweight willow or bamboo fencing, lattice or wood slat panels that can be hinged and arranged in an accordion pattern with weights for stability, and classroom shelves or dividers that can be moved outside — especially those on wheels that can be locked. Plans should always include stabilizing dividers to avoid tipping. Consider the living dividers described in the section below on plants.
For parking lots and closed streets repurposed for outdoor learning, work with your local traffic authority and safety experts to determine which materials can be used and which can be left onsite overnight. Depending on the amount and speed of the traffic that is being rerouted, signage, caution tape, and orange cones may be sufficient. Heavier traffic barriers can also be useful, such as heavy concrete bollards, planters, or jersey barriers.
SOFTENING FENCING
If your space is already fenced, consider the following ways to soften the fence and make it more child-friendly and welcoming.
Vines. Planting fast-growing vines either in the ground or in containers is an option. Mini pumpkins, cardinal vine, passionflower vine, or Black-eyed Susan vine are child-friendly choices, but vary by climate. Another option is to attach children’s art to the fence using wire or twine.
Planters. Hang small planters on the fence. There are ready-made planters available, or make your own using small buckets, old boots, felt planting bags, or burlap coffee sacks folded in half, sewn, and lined with plastic or heavy-duty felt landscape fabric, folded and secured with grommets.
Weaving. Weave streamers, ribbons, cord, or even grass into fencing.
Artwork and work surfaces. Attach artwork to fences. Or attach clear plexiglass to the fence; it can be used by teachers to display class materials or by students to create artwork.
Whiteboards. Attach outdoor whiteboards or chalkboards to the fence for instruction, but be mindful of the weight.
In all cases, be aware of maintaining visibility into the space for security purposes, consider the environmental impact of items used if they blow away in winds, and consider how the additions to the fence might impede airflow to the adjacent outdoor classroom. It is also important to ask the school district’s facilities department — or the property owner if off-campus — for permission and to ensure that additions to the fence will not affect its long-term stability

© Education Outside

© Education Outside

© Tahereh Sheerazie, EnrichLA

© Paige Green, Education Outside
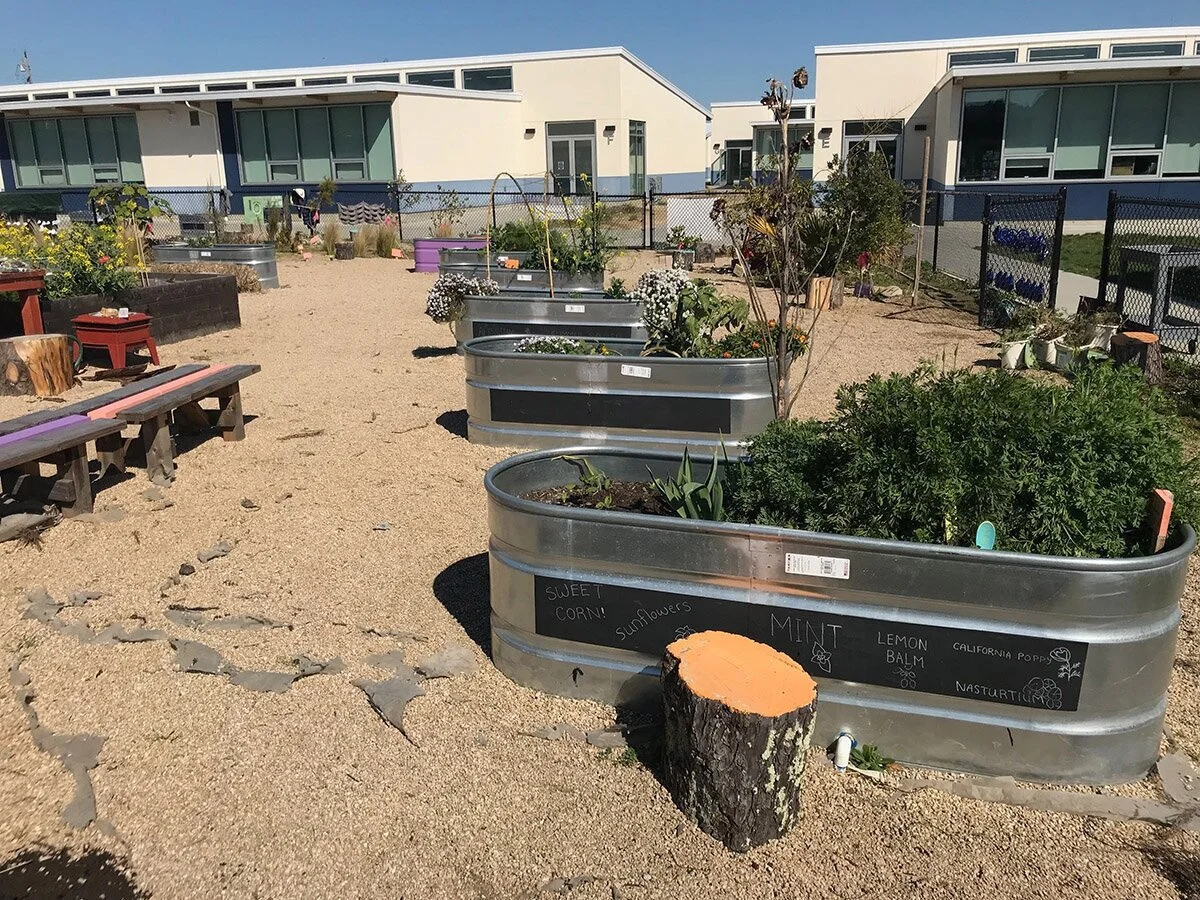
SOFTENING THE GROUND
Paved spaces can be physically softened by adding natural materials or textiles directly over the pavement. Create areas surfaced with natural materials by installing logs, blocks, or boards as edging and filling with 2 to 6 inches of wood chips installed directly over the paving. Wood chips are often available for no cost.
Exterior carpets are made to be left out in the weather and can soften and help to define an outdoor learning space. Paint paved areas to add color, visual interest and help define spaces. Light colors help reduce surface heat, but be aware that bright white paint can cause glare.
SEATING
Use sit spots and follow COVID-19 health protocols for individual mats and provide one per child. If fabric and other soft materials are not weatherproof, be sure to plan for sheltered storage overnight and when it rains to avoid mold and mildew. Straw bales can be covered in a couple of layers of fabric to reduce itchiness, scratchiness, and potential allergens (sanitize if shared between students), or in a layer of waterproof outdoor fabric to keep them from getting soaked in the rain. Tree stumps (of one or multiple heights) and horizontal logs make good seats and can also be used as dividers. See our article on Seating for more.

© Education Outside

© GOLESTAN education
SHADE AND SHELTER
Shade sails and netting hung vertically or overhead can also help to visually soften the space and reduce noise. Attach shade canopies to existing structures (e.g., eye hooks bolted to a building and posts in cement in a paved area) or to high fencing (e.g., around a sport court). Consult with an architect, engineer, or the school facilities department to be sure this is safe in your situation. Hang things that blow in the wind and add liveliness to the space like chimes, bells, wind socks, flags, and weathervanes. See Shade and Shelter for more ideas.
ARTWORK
Spaces can be visually softened with art. Children and adults can paint their benches, log stumps, and other wooden seats, create chalk drawings on the pavement, or add artful paintings to walls and pavement. Light colors can help counter heat buildup that is often present where many surrounding surfaces are paved.
Remember to use healthy, environmentally friendly paints and art materials — avoid balloons and glitter. Permanent murals may need to be reviewed and approved by the school or school district. If there are concerns about permanent murals, consider painting on sheets of plywood mounted to walls so they can be easily removed and replaced with new art by the next incoming class. Consult with an expert to determine the best mounting hardware. For more long-term transformations, masonry and concrete surfaces can be covered with mosaics — tiles donated or made by kids and arranged in colorful designs. Consider working with a local mosaic artist.

© Tahereh Sheerazie, EnrichLA

© Paige Green, Education Outside
© Education Outside

© Tahereh Sheerazie, EnrichLA

© Tahereh Sheerazie, EnrichLA
PLANTS
Plant recommendations. Consider beautifying and softening the space with fragrant plants, those with colorful flowers, edible plants, herbs, vines, and soft ornamental grasses. Annual plants grow more quickly than perennials but will last only one growing season and will need to be replaced to keep the boxes filled over the seasons. Planting from seed is an affordable way to add greenery. Buying larger plants is more expensive but provides quick screening. Our Regional Plant Lists focus on child-friendly plants native or well-adapted to each climatic zone. We recommend considering adaptive strategies, such as avoiding plants that are most likely to trigger allergic reactions.
Planters. To add greenery and life to paved spaces, to define the edges of outdoor learning spaces, and to screen them from one another, consider using large, free-standing planters or raised beds placed on the asphalt. Ensure that they are secured and are not a tipping hazard. Raised beds can be made of bricks, masonry blocks, salvaged wood, wooden shipping pallets (paired with filter fabric lining), or purchased boards (avoid pressure-treated lumber, which is often poisonous). Metal water troughs made for livestock are very popular as large-scale planters on school grounds since they come in many sizes, are very easy to install (just drill holes in the bottom and prop them up on bricks to allow drainage), do not contain any hazardous materials, and have a very long lifespan in the schoolyard. They are available around the country in garden stores and farm supply stores. Placing planters on casters will make these planters mobile, allowing for flexibility that is necessary as lessons are learned and seasons change. Besides large flower pots or wine barrels, most any container of any size can become a whimsical planter by drilling drainage holes in the bottom, filling with soil, and sprinkling in a few seeds — consider old rubber boots, gloves hung on a fence with clothespins, plastic or metal buckets, bulk food containers from restaurants, milk crates lined with fabric or trash bags, even salvaged metal bathtubs and sinks can work. Avoid porcelain because of the risk of breakage. Also avoid old tires because they contain toxins. The Using Raised Beds article offers more information about the types of planter boxes that can be used.
Living dividers. Install plants that can act as screens between outdoor classrooms to make spaces on large asphalt expanses feel cozier and reduce distractions. Tall plants, like bamboo and some tall shrubs, will act as natural screens if planted in a row of planting boxes, and they do not need a trellis. Flowering vines also make useful screens and many types of vines grow quickly. Plant vines on fences or strong trellises that are secured to the planter box so they will not blow over in the wind or get knocked down accidentally. Some small trees might also be suitable for large-scale planter boxes. Many of these tall plants and their mobile planter boxes could also be relocated in the years to come as the school's needs change.
Build a hugelkultur mound or berm directly over asphalt to soften paved areas, provide planting space, buffer sound, and screen unwanted views. Be sure to use clean soil that does not contain toxins. A berm like this is likely a long-term addition that would not be appropriate in temporary spaces like closed streets. See our article on Regenerative Gardening Practices for more.
Management. Plants provide many benefits but also need regular care. Selecting plants that are adapted for your own microclimate and planting conditions (box size) makes it easier to care for them. We recommend planning ahead for the plants’ care, before installing them, so they will thrive. Be sure to consider where the closest water source is and to purchase hoses that can reach the planter boxes and watering cans to allow more students to participate in caring for the plants. See our articles on School Gardening — Part 1 for more information.
Transforming Paved Spaces Long-term
If funding permits, the need to return to school and use outdoor spaces as classrooms may be a catalyst to identifying, planning, and designing spaces on a school campus that can serve as permanent outdoor classrooms and/or gardens post-pandemic. It may be the right time to consider removing portions of impervious asphalt, concrete, or even rubber. This will make the schoolyard more environmentally sustainable by reducing hot surfaces and allowing stormwater to infiltrate into the ground. Trees, shrubs, and other plants can make the space more inviting and comfortable by creating shade and wildlife habitat, reducing urban heat island effect, and adding living play and learning elements. See our article on Why Create Living School Grounds for more.
Credits
This article was written by Tamar Barlev, MLA-MCP, San Francisco Unified School District; Sharon Danks, MLA-MCP, Green Schoolyards America; Cara Sclafani, MBA, D3 Green Schools; Tahereh Sheerazie, EnrichLA; Nancy Striniste, MLD, EarlySpace, LLC; Mirem Villamil, Edible Schoolyard NYC. This article was also reviewed by Sarah Gill, MPP; Betsy Ukeritis, New York State Department of Environmental Conservation; and Christina Vassallo, MSN, FNP-BC.
National COVID-19 Outdoor Learning Initiative
The National COVID-19 Outdoor Learning Initiative supports schools and districts around the country in their efforts to reopen safely and equitably using outdoor spaces as strategic, cost-effective solutions to increase physical distancing capacity onsite and provide access to abundant fresh air. The Initiative seeks to equitably improve learning, mental and physical health, and happiness for children and adults using an affordable, time-tested outdoor approach to keeping schools open during a pandemic.